


Using Create React App is one of the easiest and fastest ways to build and deploy React Application projects. If you are new to React, consider using it for front-end web development. React has several libraries, features, and use cases, making it a versatile choice for building scalable, flexible, and enterprise-grade web applications. You can start building a new single-age application in React and even design multi-purpose projects.
The traditional React app development method was setting up a build system, base directory structures, and using code compilers. Thankfully, Create React App takes care of everything and comes with the required JavaScript packages.
It also includes a hot-loading feature that allows developers to refresh pages during code changes throughout development. Developers can design large-scale React apps with the Create-React-App, and we will cover that in more detail below. Let's get started.
Prerequisites
Below are the prerequisites to Create React App and building projects with it:
- You will need to download and install the latest version of Node.JS and npm package.
- A competent code editor like Visual Studio Code to work with our project files.
Features of Create-React-App
Following is a list of features developers can use in the create-react-app:
- Local Development Environment
- ES6 and ES7 capabilities
- Support for functionalities such as Async/await, Object Rest/Spread Properties, Static Properties, and Class Fields, and Importing dynamically()
- Asset Import and CSS Styling
- Run Unit Tests
- Static code analyzer (ESLint) for detecting errors
- Build scripts for creating production bundles
- React development attributes such as Virtual DOM, one-way data binding, extensions, conditional statements, and JSX (JavaScript Syntax Extension)
You can employ code splitting and separation by using the dynamic import() directive. You can create custom React templates with the correct dependencies and build progressive web apps.

Step-by-Step Guide Creating React App with Create-React-App
We will use npx as a package runner tool to install and run the Create React App.
Before we install the package, it is recommended that we uninstall any previous versions.
Open up the terminal and run the following commands:
npm uninstall -g create-react-app
npx create-react-app myfirstreactapp
If it’s your first time installing the Create React App, run this command:
npx create-react-app myfirstreactapp
Create React App will use Yarn by default, and if you prefer to use npm, you can append by running this command:
npx create-react-app myfirstreactapp --use-npm
After successfully installing the Create React App, you will be greeted with a how-to-use guide. It will help you get started building a Create React App application step-by-step. The Create React App sets up a boilerplate version of the React application and provides the added benefit of a consistent structure.
Create-React-App
Create React App offers an excellent development environment for building the best React projects. You can use the create-react app and its latest JavaScript features to optimize apps for production.
To create a project, run the following command in your terminal:
npx create-react-app my-app
cd my-app
npm start
By default, the create-react-app does not handle backend logic and databases. It is primarily meant for front-end development, but you can optimize it for back-end projects. Be sure to run the npm run build to create an optimized app build and automatically save it in the build folder before production.
React App Structure
Before we start building React apps with Create React App, let's look at the app structure we get.
You must change the directories for the app you just created. The folder and structure should resemble this:
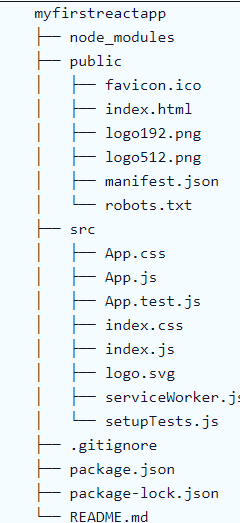
Create React App will set up the default file structure, so you don't have to worry about anything much. You can use Webpack to transform directories and files into static assets your visitors can view. The developer settings and most of what you see here for the web app will not be visible to your visitor.
.gitignore is a file used to ignore which directories and files to ignore when committing the code. It takes care of .DS_Store for Mac users and other items.
package.json
Here are a few things to note:

- The name of the app is represented as name
- version lists the current version of the app
- “private”: true is a value that will prevent accidentally making your React app public and prevent it from being pushed into the npm ecosystem
- dependencies containing all the needed Node modules and versions for creating a React project. In the screenshot above, you see six dependencies. The first three are dedicated to testing, while the next two enable you to use react and react-dom in JavaScript.
- react-scripts provides several helpful web development scripts to create React applications.
- The browserslist attribute provides information about application browser compatibility. eslintConfig takes care of code linting.
Node_modules
You can view all the dependencies and sub-dependencies used by your current React app by checking the pacakage.json file.
You can run ls -1 | wc -l within the node_modules/ directory to generate over 800 subfolders.
But don't worry! Your basic React app will be compressed for production, so the total app size will be smaller after minification. You can also view the history of changes made in the package.json file.
Src
The src folder will contain our source code, where all React-related code will reside within the app. Creating a React project will be majorly dependent on it.
Creating a Basic React Component
Open the src/App.js file and paste the following code in it to replace its contents:
import React from 'react';
const App = () => {
return (
<div>
<h1>Hello, It's my first React App!</h1>
<h2>Happy Coding!!</h2>
</div>
);
};
export default App;
This will create a basic and fully functional React component ready for use.
Rendering a Basic React Component
To render a basic, React component, paste the following code in the src/index.js file:
import React from 'react';
const App = () => {
return (
<div>
<h1>Hello, It's my first React App!</h1>
<h2>Happy Coding!!</h2> </div>
);
};
export default App;
The code basically imports the App component. The ReactDOM.render() is used to render inside the root element of the index.html file located in the public folder.
We can proceed to the development server when the React app component is ready for rendering.
Starting the React Development Server
To start the React Development Server in the terminal, enter the following command:
npm start
Once the react Development server starts, you should see the app running at http://localhost:3000.
Other Ways to Create a React Project
There are other ways you can create a React project:
1. Bit
Using Bit is one of the easiest ways to build React projects. It is simple, fast, intuitive, and scalable.
Your React app becomes composable and is built modularly with reusable components that you can conveniently create, update, deploy, and share. Thanks to Bit, you can integrate new tech stacks into your app's toolchain and workflow.
Bit allows developers to package multiple React apps into a single workspace, and there are no complex setup or support processes. It also provides out-of-the-box features such as SSR, composable styles and themes, nested routing with react-router, and more.
2. Next.JS
Next.JS is a popular choice for static and server-rendered applications. It assumes that developers are using Node.JS as the server environment. It comes equipped with modern features like hot reloading, routing, TypeScript support, smart bundling, route pre-fetching, hybrid static and server rendering, etc.
NextJS is highly optimized for server communications and more scalable than non-composable solutions. It supports SSG optimization, SEO optimization, and SSR for websites.
3. Gatsby
Gatsby is a simple, lightweight choice about speed, great SEO, and performance.
It generates static HTML in advance, which is stored on CDNs (Content Delivery Networks) and provides quick access. You can use hundreds of plugins with Gatsby to extend its existing functionalities and add customizations and integrations.
Final Words:
You can now start developing React project with React app.
If you don’t want to use the Create-React-App, you can use React directly. Though using the Create React app is not mandatory, it dramatically impacts project performance and accelerates development turnaround times.
For teams that deal with tight deadlines and want reduced time to market, the Create-React-App provides a convenient way to fast-track application development.
If you want to hire dedicated React developers for your next project, contact Clarion Technologies.

Author

Vinit Sharma - Technical Architect
Vinit Sharma, a seasoned technologist with over 21 years of expertise in Open Source, cloud transformation, DevSecOps strategy, and software architecture, is a Technical Architect leading Open Source, DevOps, and Cloud Computing initiatives at Clarion. Holding certifications as an Architect and Business Analyst professional, he specializes in PHP services, including CMS Drupal and Laravel, contributing significantly to the dynamic landscape of content management and web development.

.jpg?width=375&height=240&name=DEVELOPING%20APPS%20WITH%20FLUTTER%20(1).jpg)
