


-A-Secure-Database-for-Your-Business.jpg?width=510&height=310&name=Azure-SQL-(Vulnerability-assessment)-A-Secure-Database-for-Your-Business.jpg)
With increased agility and lower cost of ownership, Azure SQL Database is a widely used and most trusted database service in companies where speed time to market is critical. It is a managed cloud database available as a part of Microsoft Azure. There are plenty of reasons to move to the Azure SQL database, including cost saving, enhanced scalability & performance, business continuity, streamlined database, and exceptional security.
Read 7 Reasons Why Azure Is an Excellent Choice for Start-Ups
Security is at the top of the list as data breaches are increasing year on year and there is a need to protect sensitive data stored in the Azure SQL database. According to a report of the Online Trust Alliance, 37% of the security breaches were due to internal threats, which could have been prevented. The Azure SQL Database includes its own set of security features to protect data and ensure strong security.
Earlier, SQL developers were using external tools and even developing customized code to detect, monitor and resolve the security vulnerabilities. Fortunately, Azure SQL Database came up with a feature called the Vulnerability Assessment tool.
Vulnerability Assessment (VA) is a part of built-in data security capabilities known as Advance Data Security (ADS) for Azure SQL databases. This is a scanning service that provides a vision of any possible security threats and also provides pragmatic steps to resolve them. Let us explore how to implement this tool to track vulnerabilities in your relational SQL Database.
In order to access Vulnerability Assessment services, Advance Data Security should be enabled for the server. For any new database that is being created, while creation you will see an option to enable the same.

For any existing database server, it can be enabled by navigating to the Advanced Data Security under the Security heading. This will ask a storage account to be connected for storing the scan results. You can use any existing storage account or create a new one, but a storage account is mandatory as it will store the scan results.

The pricing for ADS aligns with the Azure Security Center standard tier, where each secured SQL server is counted as one node. Thus, all the databases protected under a server will only be charged once.
Implementing the Vulnerability assessment -
1. Run a scan
Click on the blade for the ‘Advance Data Security’ in the left menu. From the three methods displayed for security, choose ‘Vulnerability Assessment’. Here, click on ‘Scan’
The scan usually takes around a minute to execute and is entirely a read-only operation.

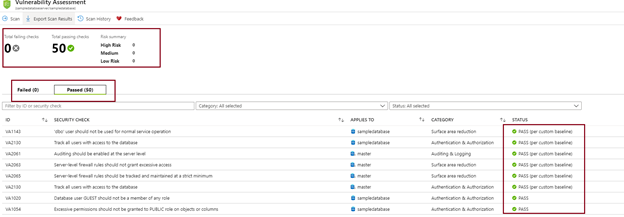
2. Understanding the scan report
Once the scan is completed, the results can be read on the portal or can be exported to excel. The report displays high-level information about the items scanned with the numbers of passed and failed checks. It further categorizes the failed checks in the order of the Risks.

The bottom section of the report shows the identified failed checks for several categories like - (a) Auditing & Logging (b) Surface area reduction (c) Authentication & Authorization, etc.
3. Analyzing individual scan failure result
On clicking the individual scan result, we can understand more about the reason for the checkpoint failure and a possible fix for the same. The top section elaborates impact of the scan finding and the bottom section for the remediation provides the resolution.

4. Setting up a baseline
Once all the results are reviewed, you can mark certain results as being acceptable by “approving the baseline”. Once the baseline is set, in the forthcoming scans, these items will be marked as passed and the rest will be listed as deviations.

5. Run a new scan
This new scan result will be a customized result set as per the baseline rules above. Going forward, you can simply click on “Scan” to check the vulnerabilities. The passed results report highlights the items that are approved as per baseline. This baseline can be cleared as well by clicking on the item and select ‘Clear Baseline’.
6. Scheduling the scans
If you wish to set up recurring scans for the database server, it can be achieved under ‘Server Settings’. Once the recurring scans are scheduled, it runs every Sunday around 12:00 AM UTC. The results are stored in the storage account linked to Advance Data Storage or a new storage account can be used. These results can also be sent over an email to the specified users.

7. View History of the scans.
By clicking on the Scan history on the top blade, you can see the log for the scans executed for the server and the type of the execution as OnDemand or scheduled. The number of failure results is listed here as well.
 A
A
similar process can be followed directly at the database level in SSMS.
The vulnerability assessment tool makes it extremely simple to implement the security features in just a few clicks. It also offers great visibility in the database and strengthens the Azure SQL security structure. Maintain an awareness of the security vulnerabilities in your environment and respond quickly to eliminate potential threats with a regular vulnerability assessment.


