


In this era of information technology, people are fascinated about the web and they’re being connected with each other via wireless networks. People prefer online for everything, including shopping, reading, and playing. Hence, to succeed in modern business, you need to have a professional website that allows reaching more consumers.
PHP is the most popular and preferred language to build websites. It is an open source, platform independent language & lightweight language. Here are the benefits of developing a website with PHP:
- It’s easy to develop and manage
- It gives low development and maintenance cost
- It provides high performance and reliability
- It gives database flexibility as well
- With PHP 7, programming with object-oriented becomes easy and advanced
Website speed and performance plays a major role in the success of any business. This is where NGINX appeared. To execute PHP files, we need some web server and PHP executable files. Apache is a default web server used to run PHP files. When there was a huge thirst to innovate with new technologies, Apache was the platform of choice. However, when it comes to speed, it fails to set the benchmark preferred. Since, it always spawns a child process each time a new request comes in. As such when the website receives many requests, there will be problems with the RAM. This is because each process takes a chunk of the RAM for handling the requests. NGINX comes as a solution to the limitations of Apache.
What is NGINX?
NGINX is another popular open source web server developed by Igor Sysoev. It is well known for High-performance load balancer and it is dedicatedly designed to accelerate a large Apache‑based service.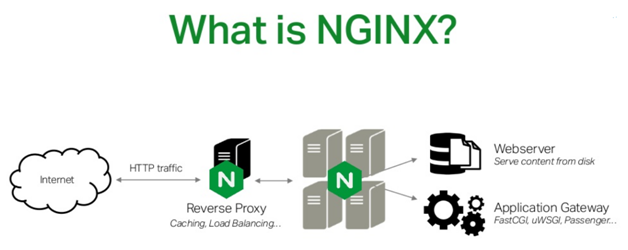
Image source: slideshare.com
NGINX PHP-FPM (PHP – FastCGI Process Manager) is a better option for higher performance. PHP-FPM is an alternative FastCGI for PHP, which intends to handle high loads. NGINX uses event-driven architecture and occupies around 10MB of RAM while handling a large number of requests. PHP-FPM is enhanced in terms of speed. It is a lot better than a mod_php module – a default module in Apache HTTP server. PHP-FPM is an independent process and does not require to be loaded by the web server, whereas mod-php locks out the processes and affects the website performance. In addition, PHP-FPM is loaded with some effective features including:
- Adaptive process spawning
- Support for a "slowlog"
- Stdout & stderr logging
- Basic statistics
- Accelerated upload support
- Emergency restart during accidental opcode cache destruction
…and much more.
Beyond these advantages of NGINX PHP-FPM, they communicate via TCP; hence, both ensure low memory footage.
Setup for NGINX PHP-FPM on Ubuntu - Linux
Step 1: Installing NGINX
Since NGINX is a default repository of Ubuntu, you can install it with the apt package using the following commands: [command source: websiteforstudents.com]
Once installed, you can use these commands to stop, start, and enable NGINX and check the status of NGINX service:
Here is a sample output of server status: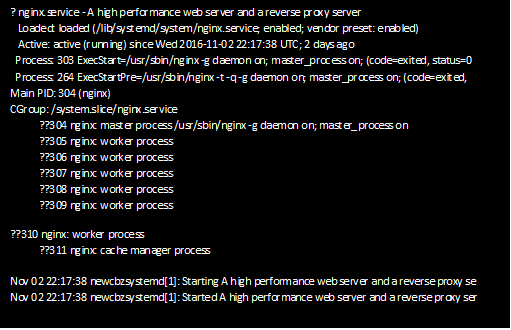
Source: cyberciti
Step 2: Installing PHP-FPM & Related Modules
We have several PHP modules that perform various functions. Let us include some vital ones that are always required when building PHP based websites. The command below installs PHP-FPM and vital modules:
The above command enables PHP to function with popular PHP-based sites and apps.
Step 3: Configure NGINX with PHP
After installing NGINX and PHP, now it’s time to configure NGINX and PHP.
The default NGINX PHP configuration location is:
Here x varies 0 or 1 based on your PHP versions.
Use the following command to open the NGINX PHP configuration file
Now, you can edit the file based on your environments. Some crucial lines to concentrate are:
Next, you need to open the NGINX site config file – its default location is
Use the following command to open the file:

Once opened, in order to enable NGINX PHP support, uncomment the lines highlighted in the command below: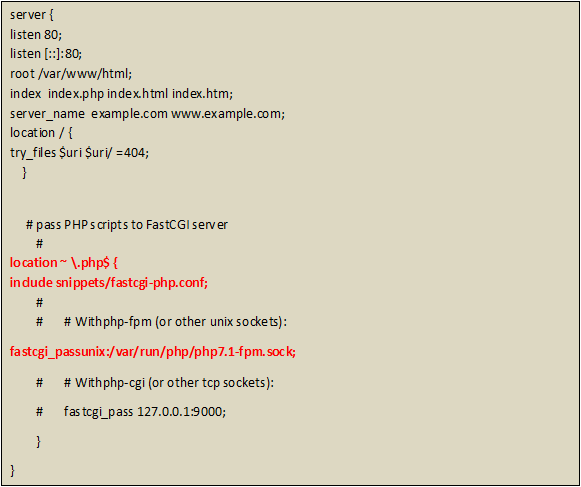
Next, Restart NGINX & PHP-FPM services
Step 4: Test PHP-FPM Configuration
At this point, you have to test whether the NGINX PHP-FPM set-up is ready or not – create a blank file using the command:
Then, enter the line given below and save the changes:
Now, open the browser and search the server name or IP address with the file name as shown below: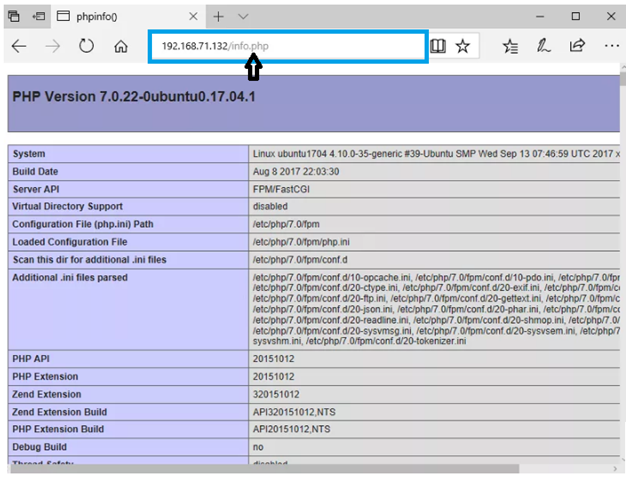
Source: websiteforstudents
If you find the result something similar to the above screen, you have successfully configured NGINX PHP FPM on your Ubuntu or Linux server.
Benefits of NGINX vs Apache
- NGINX supports reverse proxy, using this feature; we can decrease the number of calls to our applications by enabling load balancing.
NGINX Plus as a reverse proxy for PHP backend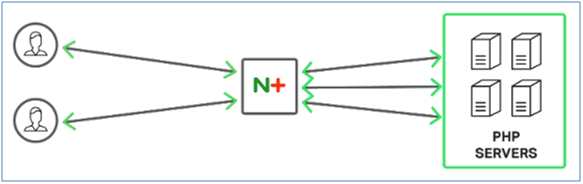
Source: nginx.com
- Along with load balancing, NGINX Plus offers more sophisticated session persistence
- NGINX performs better than Apache2, during high traffic and while serving static files
- Since NGINX sits between clients (e.g. browsers) and the application, it can act as the cache. It results in a drastic reduction of response time from the client perspective
- The micro caching technique of NGINX increases performance
NGINX is the most prominent webserver and responsible for hosting the largest and highest-traffic sites on the web. Now that you’ve installed your NGINX web server, you have several options for the kind of content to serve, as well as the technologies you need to build a richer experience.


