


Beta testing, sometimes also referred to as User Acceptance Testing (UAT) is basically a prerelease testing where applications are subjected to real-world testing by the intended audience for the software. The experiences of the early users are then forwarded to the developers who make final changes before releasing the software commercially.
Generally, for in-house testing, volunteers or paid test subjects use the software, whereas, for a widely-distributed software, developers may make the test version available for downloading and free trial over the Web.
Apart from creating a buzz for the final product, distributing an app for beta testing has several benefits like -
Benefits of Beta Testing
- Beta testing provides early access to a new app or to new features of an already existing app. It provides the stakeholders an opportunity to iron out any creases that may have been overlooked during the alpha phase.
- Involving hundreds or even thousands of real users in real environments for testing allows you to catch any glitches that may not have been spotted previously.
- Identifying and fixing those issues during the beta phase can reduce development costs significantly. In addition, it helps the customer to avoid a potential risk associated with a bad public launch.
- Beta testing also provides customer validation beyond technical anomalies, providing product managers the feedback and analytics that they need to figure out as to whether to include or exclude specific features.
However, trying to get an iOS test app out to beta testers and stakeholders can give you a severe headache at times. Often there is a lot of confusion and misunderstanding surrounding the process which can only result into project delays and endless trails of emails between developers, producers and clients.
With Android, you can consider distributing your app via email, Google drive, HockeyApp or even Google’s Beta program; but distributing an iOS app is slightly more elaborate. This is mostly because apple has a highly secure ecosystem to restrict malware and viruses from infecting their products. To confirm confidence in the identity of the app provider, Apple issues certificates and links them to devices. The app will install on device only if app and device have a matching certificate. It applies for both beta testing and published app as well.
Please read on as I try to explain the nuances of test distribution for iOS apps and how it works.
Getting a test app onto devices
- Register (organization): Register for an Apple Developer Account and choose a distribution service for your app.
- Collect emails/Apple ID (producer/PM): Gather all the email addresses (Apple IDs) linked to test devices and send them to your developer.
- Add emails (anyone with account access): Add the emails to the team account.
- Build (developer): Your developer creates a new build provisioned for the test devices.
- Receive notification (testers): All testers are notified via email when the build is ready to install. Testers without Testflight account will receive an email instructing them how to register for the (free) service.
- Install app (testers): Testers need to follow the links in the notification email to install the app.

Prima facie, it surely does look simple, right? But, if you are new to this, there might be a whirlwind of questions buzzing through your mind right now like – What is a developer program? What if you have several dozens or even hundreds of stakeholders and testers who need builds? What are the differences between various distribution approaches?
What is a UDID and who needs them?
Let’s clarify all these doubts one by one.
1. Register (organization)
If this is your first-ever app, you need to register your organization with an Apple Developer Program and select a distribution program.
Developer Programs
These programs allow developers to create certificates and issue Provisioning Profiles for their apps. A Provisioning Profile is like a season ticket issued to your app by Apple, and it permits an app to be installed on particular devices. Each provisioning profile contains the app’s distribution certificate, a list of UDIDs and another application configurations.
Normally, a client gives their developer login and password access to their Developer Program or can add the developers as team. This ensures that the app doesn’t move out of the trusted circle and stays within the organization.
There are 2 developer programs offered by apple are - Standard and Enterprise.
Standard
The iOS Developer Program allows developers to provision apps for development and testing and allows you to submit to the App Store. This program costs $99 per year per developer account, at present.
The Standard Developer Program limits the number of devices per developer account to 100. In addition, devices can only be removed (freeing up device slots) once per membership year.
Enterprise
The Apple Enterprise Program is for developers who create exclusive in-house iOS apps. It allows developers to allocate apps for unlimited devices in an organization but doesn’t permit you to submit to the App Store. The Enterprise program currently costs $299 annually. You can enroll yourself in both Standard and Enterprise programs if need be.
iTunes Connect
iTunes Connect is a tool offered by the Developer Program that helps developers to submit and manage apps for distribution on the App Store, check the status of contracts, acquire sales and finance reports, set-up tax and banking information, and manage iTunes Connect users as well.
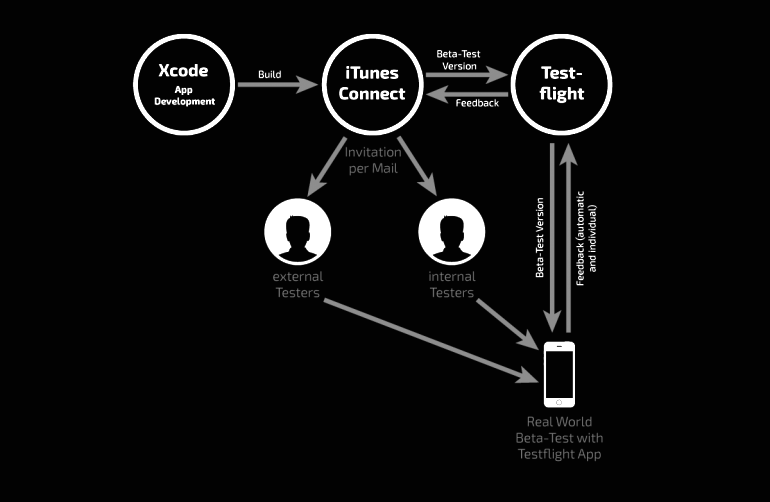
Distribution Programs (TestFlight)
As Testflight is owned by Apple, it distributes via the app store and handles the security of allowing only the right people to install the app. It makes things much easier for developers as there’s no provisioning profiles to worry about—all you need in this case is the user’s email address. However, you should be aware of a few limitations:- Builds expire 30 days after invitations are sent
- Testflight only supports iPhone, iPad and iPod touch devices running iOS 8 & above
- Each developer account can be enabled for a maximum of 10 apps at a time
- Each tester account is limited to a maximum of 10 installed apps at a time
- You can send the app to up to 25 internal and 1000 external testers
Internal testers
- They are the ones who usually work within your organization.
- They must be members of your iTunes Connect team with the Admin, Legal, or Technical role. Builds sent to Internal Testers don’t need to be reviewed by Apple
External testers
- They don’t need to be in your organization, all you need is their email address.
- Before you can invite external testers, the build must be approved by Apple via a process called ‘Beta App Review’.
- There is a possibility that the review takes several days and builds will always expire 30 days after invitations are sent.
Manually Installing Apps
- It is possible to install builds manually using XCode.
- The build still needs to be distributed for the device receiving the build, and the device needs to be physically connected to the machine running XCode.
- For remote distribution, or to distribute to more number of people, manual installation isn’t practical.
2. Collect emails(producer/PM)
If your project is setup fittingly and all the team capitalized with one of the distribution services, you’ll simply need to send your developer the email address of each tester. For external testers, I suggest that you also keep their first and last names handy. The developer will then add these addresses to the team account.
Whereas, a Testflight user can use the same email address to test an app on up to 10 devices and test many apps simultaneously for multiple developers.
The above-mentioned scenarios are ideal scenarios. In practice though, developers may have to gather at least some UDIDs. If that’s the case, here’s how to find your UDID, which is a sequence of 40 letters and numbers specific to your device. In fact, there are whole websites dedicated to explaining how you find it.
3. Add Emails (anyone with account access)
The developer will then take the list of emails provided by the client and them to the team account (HockeyApp or Testflight) using iTunes connect tool.
4. Build(developer)
Developer needs to build application using respective distribution certificate and provisioning profile. On successfully building the application, developer needs to upload application to iTunes connect using XCode or Application loader.
Testflight apps require the Beta App Review (which might take several hours) and must comply with the full App Store Review Guidelines. A review is also required for new versions of your app that contain significant changes.
Once the new build is finally uploaded, developer needs to add Internal and/or external testers from iTunes connect. The testers receive a notification email.
5. Receive notification(Testers)
If a tester already has an account, they’ll simply receive an email invitation to test the app.
Testers without Testflight account will receive an email instructing them on creating a free account and install the app. This invitation should be opened, and instructions followed, on the test device.
Sometimes clients have trouble following the links in the invitation email. In that case, here are guides for Testflight
Testers receive notification emails for each subsequent release of application.
6. Install app (Testers)
The tester’s notification email contains easy to follow directions to install the app. Make sure that you delete the previous version before installing a new version.
Eventually, when the tester presses ‘install’, the app presents the provisioning profile to the device. The device ensuring the device UDID matches the UDID in the provisioning profile.
If the UDID matches, the app is installed.
If it doesn’t match or isn’t listed, the app won’t install and you’ll go back to step 2.
At Clarion, we always follow this practice of distribution for internal and external iOS application. It is a quick and easy practice that suits both the developer as well as the customer. Several of our clients have benefitted from Beta testing.
An excellent example of this is a Video Conferencing room booking app that we developed for 300+ employees to book 10+ meeting rooms across the geographically dispersed development centers and with a facility for repeat bookings, etc. For this, it was necessary for us to test the app thoroughly.
In order to ensure that we conduct the testing efficiently, we followed all the steps mentioned above – i.e., create a certificate and a profile, add internal testers, generate and upload the build, send out invitations to testers and to install the app on the device. This helped us centralize processes and ensure quick distribution of the app.
This also makes it is easy to update and maintain, provides fast and safe access to the application and reduces rework of creating a build for different test users.
Hope this blog gives you a better insight into how you can go about distributing iOS apps to testers and what are the essential aspects of beta testing in a product development cycle.
Author

Dilip Kachot - Technical Architect Delivery
Dilip Kachot, a seasoned Technical Architect with over 7 years of experience in the Mobility domain, excels in driving successful delivery of cutting-edge solutions. His expertise lies in architecting and implementing innovative mobility solutions that align with the evolving technological landscape.
%20(15).jpg?width=375&height=240&name=Purple%20and%20Red%20Illustration%20Minimalist%20X60x6%20Squad%20Gaming%20Desktop%20Backgrounds%20(800%20x%20470%20px)%20(15).jpg)

