


Learn how to use SwiftUI for iOS app development and build the best interfaces.
SwiftUI is an excellent choice for iOS app development because of its intuitiveness and ease of use. Using SwiftUI is like ordering pizza, you don’t need to know how to cook or worry about the equipment, staffing, and details. You say what you want, and SwiftUI will care for the rest.
Here is everything iOS developers need to know about SwiftUI for UI development.
What is SwiftUI?
SwiftUI is a user interface framework developed by Apple to create beautiful and dynamic apps in declarative ways. It is used for building modern user interfaces for iPadOS, watchOS, tvOS, visionOS, and macOS. Swift was introduced in 2019, and the framework has come a long way since then. It allows cross-platform development and offers developers various features such as lists, texts, stacks, buttons, selectors, and many other elements.
How Does SwiftUI Work?
SwiftUI is a revolutionary new approach to building apps for Apple platforms and devices. It saves developers time from extensive code management and maintenance by writing apps using a declarative syntax. In simple terms, you tell the framework how you want to build your app and specify properties/features such as fonts, alignment, colors, shapes, etc.
SwiftUI takes care of the rest and applies complex animations and stylistic elements. There are only a few lines of code, and it can make your apps livelier by dealing with user interactions.
Why SwiftUI for Building iOS App
Here are a few reasons why developers prefer to use SwiftUI for iOS app development:
- Makes refactoring significant UI components more effortless and works with iOS 13 and up
- Merge conflicts are less likely to occur, and it is wholly comprised of Swift code
- SwiftUI views can be used in Storyboard-based UIs and vice versa; it helps with seamless migrations and focuses on improving developer workflows.
- The code is fast and easy to update, ideal for building iOS apps with SwiftUI for enterprises.
- It is expected that SwiftUI will dominate modern iOS app development in the coming years.
Using SwiftUI
In this guide, we will discuss SwiftUI essentials and cover the basics.
However, we strongly recommend going through Apple’s SwiftUI tutorials once you finish reading our post. Apple covers framework integrations and includes additional resources and documentation, which are very useful for mastering the basics of UI development. You can explore sample code projects to learn SwiftUI more and delve deeper.
How to Migrate from UI Kit to SwiftUI?
Ultimately, you can convert a UIKit project to SwiftUI and migrate it. The easy but hard way is to rewrite everything from scratch. However, that's not realistic, and most developers want to migrate individual components, so they have to take a slower approach.
Here is how to do it:
- Start with your popups, plain images, and the most profound elements of your navigation hierarchy. Wrap your new SwiftUI views you migrate in UI Hosting Controllers (not UIViewControllers to UIViewRepresentable)
- Apply the same to individual flows like Authorization flows and tutorial flows. Replace the UITabBarController with a TabView, then the scene to SwiftUI. Create a diagram of your migration plan to assist the team and your project manager.
- For newly migrated screens, update the features added in the app. Don't delete the old UIKit code until you have copied and updated all features for the entire flow in the new app. You will use the old code as a reference point throughout the migration process.
- Merge all SwiftUI migrations per release by creating a git branch. Make a parent branch where you will merge all the changes on a single branch.
- Write new tests, migrate deep links, and remember your calls to analytics tracking and other similar functionalities like recommenders.
- Create utility and wrapped views, view modifiers, and extensions for your UIKit to SwiftUI migration. Be prepared to store them on a separate branch and merge them with your per-screen branches.
- It is recommended that complex animations in UIKit be wrapped and kept until it fully supports iOS 17, which features robust animation tools.
Building a Project with SwiftUI
Before we start, you will need macOS Catalina and XCode 11 Beta to have SwiftUI render the Canvas (Simulator) correctly. Refer to this guide to learn more about the installation process.
Now, let's start setting up a project with SwiftUI:
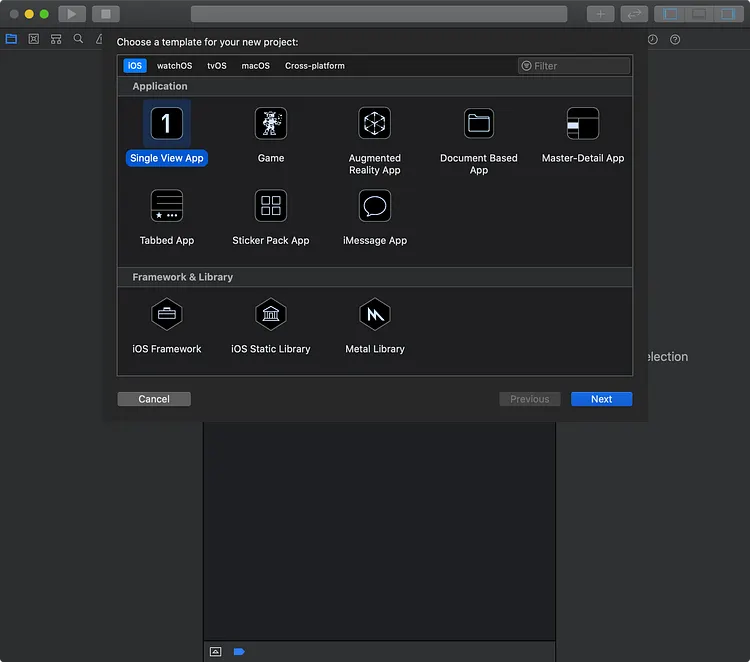
- To create a new project in Xcode Beta and include SwiftUI, select the Single View app:
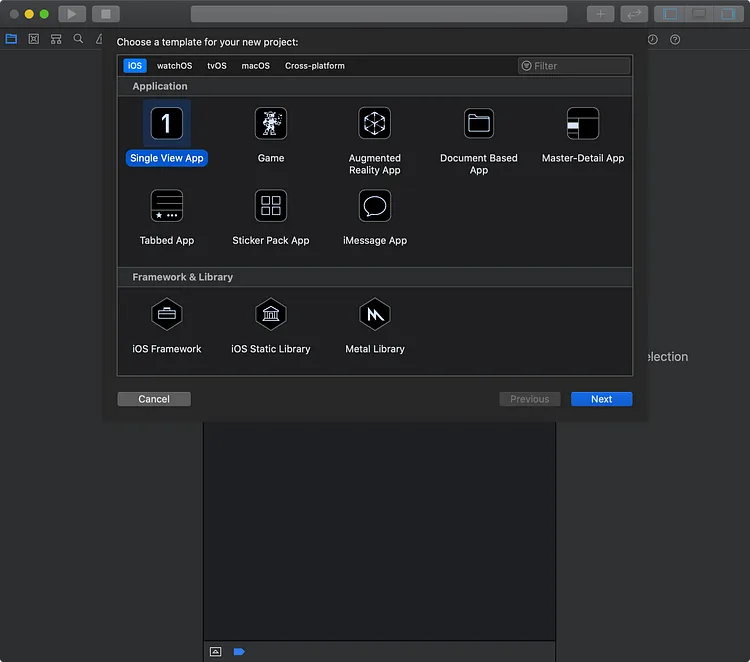
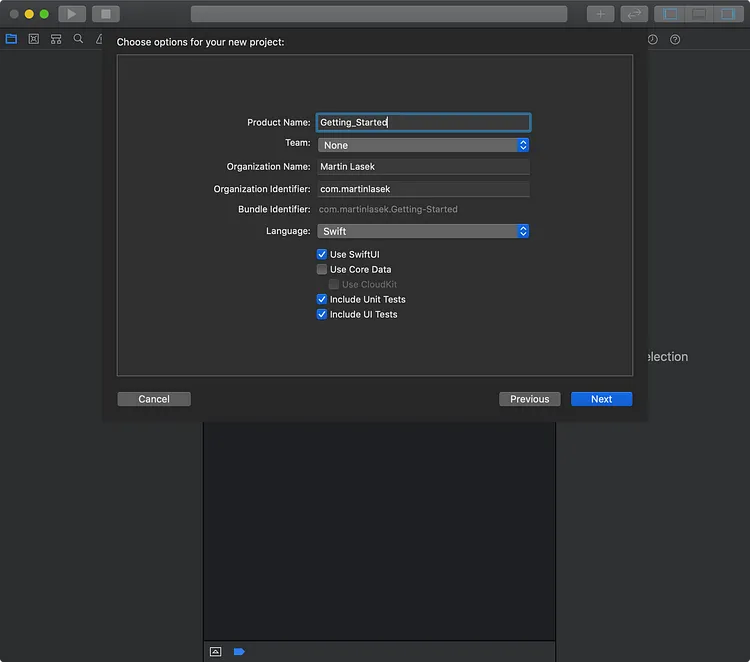
- Make sure Use SwiftUI is checked before deciding where to create the project.
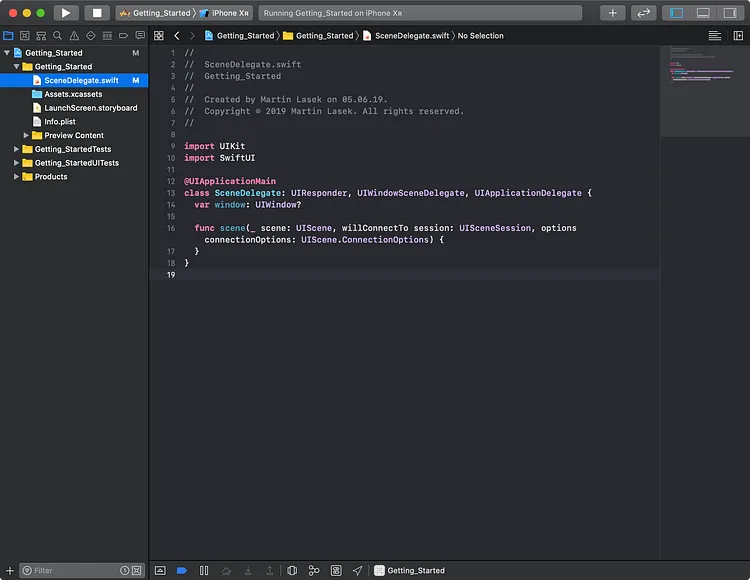
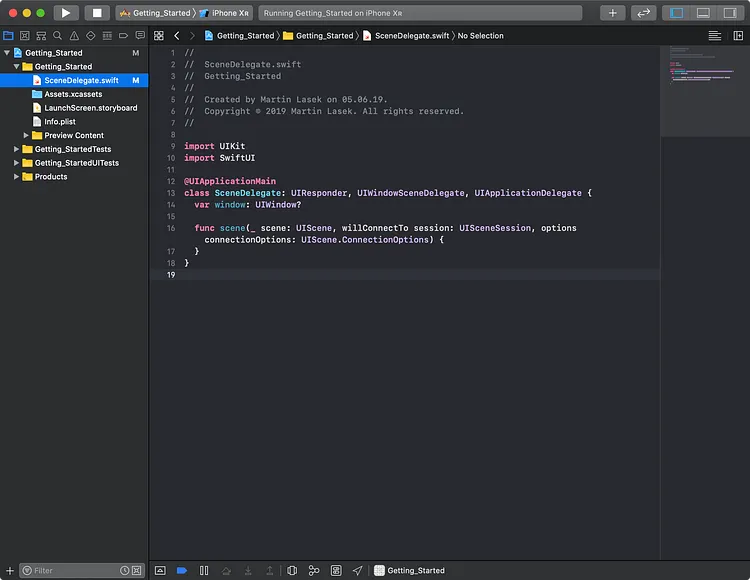
- Delete the AppDelete.swift and swift files. Navigate to SceneDelegate.swift and add @UIApplicationMain to the top of the SceneDelegate class. You will let UIApplicationDelegate conform to the SceneDelegate class, and it will serve as the entry point to your application.
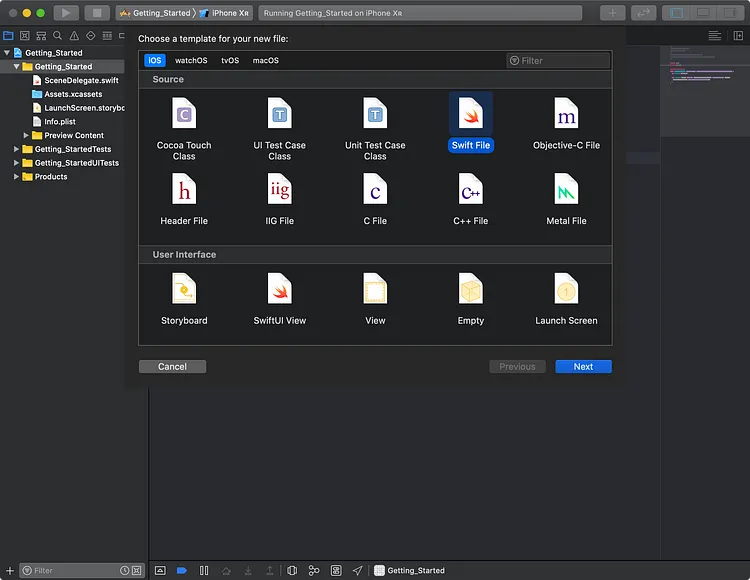
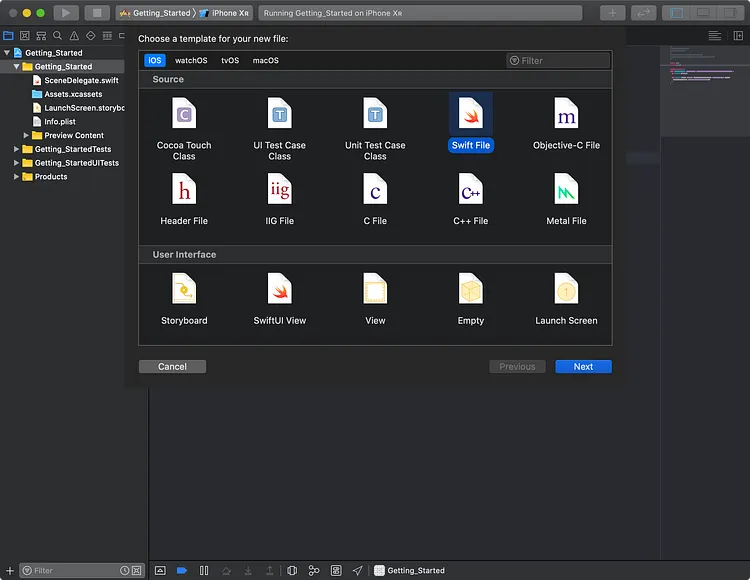
- We'll begin with the Canvas (simulator) for your following code. Please create a new Swift file and rename it to swift.
- Add the following code to swift:
import SwiftUI
struct AwesomeView: View {
var body: some View {
Text("Hey! This is aawweesomee!")
}
}
- This is now our new SwiftUI view. Add the following code to trigger the Canvas and generate a live preview:
#if DEBUG
struct AwesomeView_Previews: PreviewProvider {
static var previews: some View {
AwesomeView()
}
}
#endif
- Define your SwiftUI view as your first view on the app launch now. Add the following code inside swift:
import UIKit
import SwiftUI
@UIApplicationMain
class SceneDelegate: UIResponder, UIWindowSceneDelegate, UIApplicationDelegate {
var window: UIWindow?
func scene(_ scene: UIScene, willConnectTo session: UISceneSession, options connectionOptions: UIScene.ConnectionOptions) {
if let windowScene = scene as? UIWindowScene {
// (1)
let window = UIWindow(windowScene: windowScene)
self.window = window
// (2)
let vc = UIHostingController(rootView: AwesomeView())
window.rootViewController = vc
// (3)
window.makeKeyAndVisible()
}
}
}
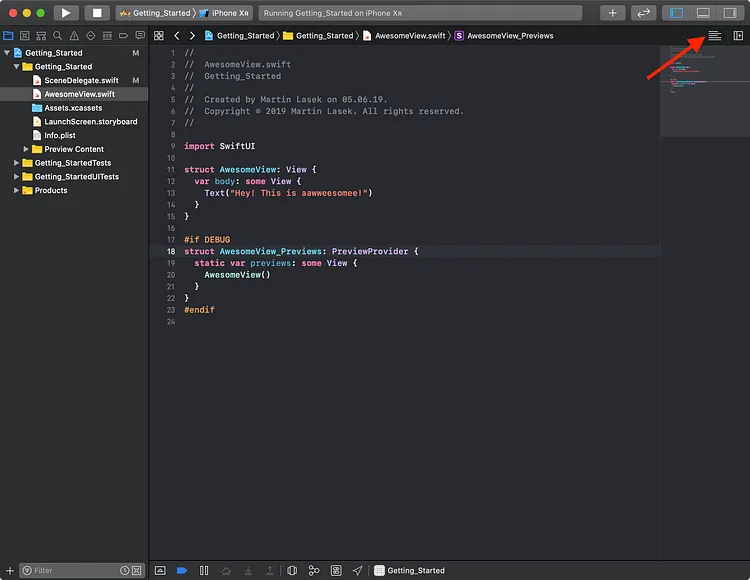
- To see live previews, click on the Editor and Canvas menu point.
- Click on Resume or try again to refresh the canvas state.
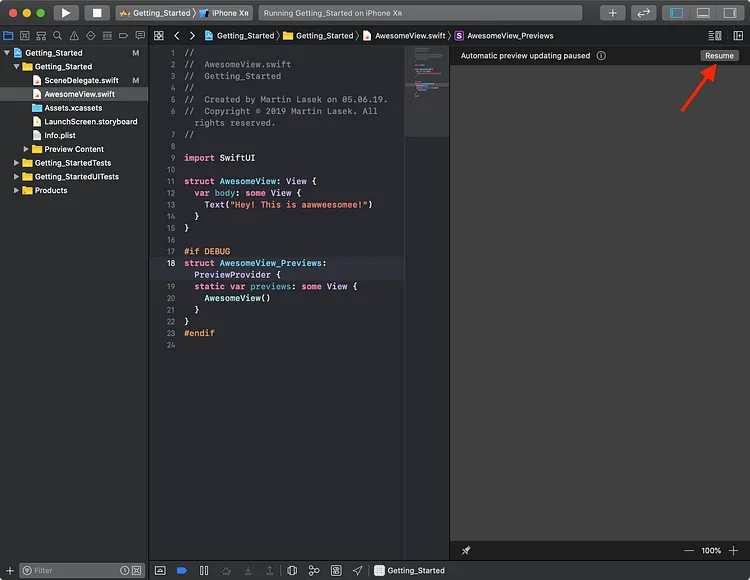
- It will show you a preview of all the views you return to inside the AwesomeView_Previews We have only one view in this code, but it is an instance of our AwesomeView. You can rename your structs, call them however you want, and edit the code later.
- You can now run the app and get started. From here on out, you customize the project and add features to your app. This covers how to start building your app using SwiftUI.
Images, Shapes, and Media in Swift UI
The primary way to create and display graphical assets for UI programming projects is to use SwiftUI Image. You can design visuals and build user interfaces for Apple devices that are captivating and dynamic. Keep in mind that image views in SwiftUI are not interactive.
SwiftUI Image
There are several modifiers you can use to customize images using SwiftUI image, which are as follows:
- resizable()
- aspectRatio(contentMode: .fit)
- cornerRadius(_:)
- padding()
Here is a sample code that lets you preserve the aspect ratio of the image, add padding, and round corners:
struct ContentView: View {
var body: some View {
Image(.building) // Replace `.building` with your image's name
.resizable()
.aspectRatio(contentMode: .fit)
.cornerRadius(10)
.padding()
}
}
To change the shape of your image, you can use the clipShape modifier and pass it to the Circle() parameter. If you want to use System symbols instead of image assets, you can create your view with (systemName: "Symbol Name") and replace the "Symbol Name" with the name of the SF symbol you want to display.
Here is another example of how you would use these modifiers to customize your images:
// Aspect ratio
Image(.building)
.resizable()
.scaledToFit()
.aspectRatio(contentMode: .fit)
// Frame
Image(.building)
.resizable()
.frame(width: 300, height: 300, alignment: .bottom)
// Shape
Image(.building)
.resizable()
.cornerRadius(5)
Image(.building)
.resizable()
.clipShape(Circle())
// System Symbol
Image(systemName: "cloud")
.font(.largeTitle)
ImageRenderer and Canvas
ImageRenderer is an object you can use to create images from SwiftUI views.
You can export BitMap data and initialize the renderer to render images on demand.
You can generate images from paths, shapes, gradients, and more. It lets you render standard SwiftUI views and containers of multiple view types. You can also create custom images by drawing into the Canvas and starting to render CGI images from it.
SwiftUI Form Validation Techniques in iOS app
SwiftUI's form validation techniques in the iOS app make it easy to validate inputs before they are processed. Many simple properties can be used to call functions or read computed variables. Users can set any conditions and take it further by specifying input requirements and lengths.
Here are a few SwiftUI form validation techniques you can use to get started.
Disabling Forms When Creating Accounts
In this example, we tell SwiftUI not to create an account for users unless both fields in the form are filled in. The form will accept a username and an email address. It is disabled by using the disabled() modifier like this:
struct ContentView: View {
@State private var username = ""
@State private var email = ""
var body: some View {
Form {
Section {
TextField("Username", text: $username)
TextField("Email", text: $email)
}
Section {
Button("Create account") {
print("Creating account…")
}
}
}
}
}
.disabled(username.isEmpty || email.isEmpty)
Custom Form Validation with SwiftUI
Below is an example of how custom form validation works in SWiftUI:
struct ContentView: View {
@State private var name: String = ""
@State private var email: String = ""
var body: some View {
Form {
TextField("Name", text: $name)
TextField("Email", text: $email)
Button(action: {
if validateForm() {
// Form is valid, submit
} else {
// Form is invalid, show error
}
}) {
Text("Submit")
}
}
}
func validateForm() -> Bool {
if name.isEmpty || !email.contains("@") {
return false
}
return true
}
}
The above code checks whether the user has entered a valid email address and name. If the input is wrong, the function will return false. Otherwise, the form is validated, and the result returns as true.
SwiftUI vs Interface Builder and Storyboards
SwiftUI addresses many issues developers have faced since following the Swift + Interface Builder approach. Developers no longer need to worry about source code control problems, and the code is much easier to read than standard massive storyboard XML files. SwiftUI eliminates a single point of failure, and users don't need to call functions that don't exist.
SwiftUI completely replaces the Interface Builder and Storyboards. The code is written in the code editor, and XCode renders the UI in real time and displays it on the canvas. Developers can now compose their desired UI using spacers, stacks, and padding. There is also no need to define layout constraints anymore. SwiftUI and Interface Builder can be used together to split up interface files and prevent concurrent modifications. However, using both can make code reviews difficult, so developers stick to SwiftUI for live previews instead.
Mastering SwiftUI for iOS App Development
Mastering SwiftUI for iOS app development takes time, but it is worth the effort. Developers should be able to work with static text in SwiftUI and apply advanced styling using AttributedString.
The magic of SwiftUI lies in its simplicity, and you will find that there is no need to use Interface Builder and Storyboards outside of it. Swift is an innovative framework that makes creating and deploying modern apps for iOS incredibly efficient. It takes just a few lines of code, and you can try out SwiftUI iOS app development services to build on-demand apps, AI-powered apps, eCommerce chatbots, and all kinds of applications.
To hire SwiftUI developers, connect with Clarion Technologies today.

Author

Vinit Sharma - Technical Architect
Vinit Sharma, a seasoned technologist with over 21 years of expertise in Open Source, cloud transformation, DevSecOps strategy, and software architecture, is a Technical Architect leading Open Source, DevOps, and Cloud Computing initiatives at Clarion. Holding certifications as an Architect and Business Analyst professional, he specializes in PHP services, including CMS Drupal and Laravel, contributing significantly to the dynamic landscape of content management and web development.


%20(11).jpg?width=375&height=240&name=Purple%20and%20Red%20Illustration%20Minimalist%20X60x6%20Squad%20Gaming%20Desktop%20Backgrounds%20(800%20x%20470%20px)%20(11).jpg)